Categories
Level Design

Map Design

I am creating this as for some reason I can’t post images onto the discussion board.

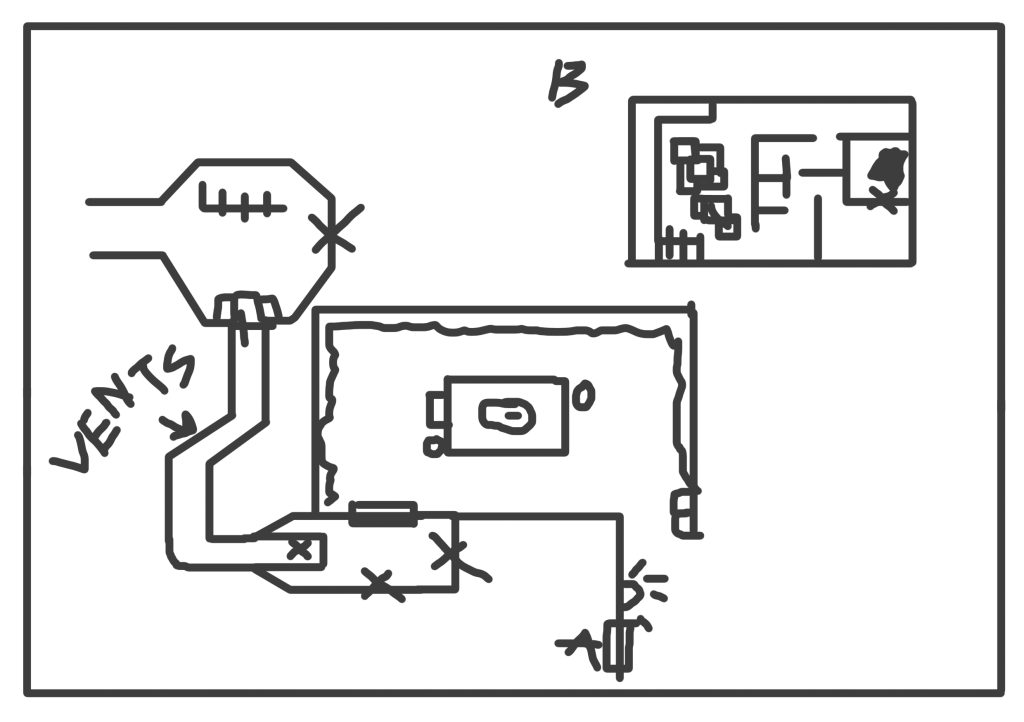
With this you would start at the top left walking in and finding some stairs to your left that appear to broken and a door in front of you that’s locked, you look around more realising that there’s some boxes that allow you to get up to a vent system, the vent seems easy enough to remove as it hadn’t been used in quite a while and neither had the building. you climb through the vents hearing whoever it is that took you here and is now hunting you down. as you near the end you realise that the vent goes up to the roof but it’s too high up to reach and the sides of the vent are too smooth to climb up. You realise that you need to backtrack slightly to one of the openings that you heard your hunter through and drop back down to the ground level.

After this you find yourself in a large almost reception desk room with three normal doors and a pair of glass double doors those similar to the automatic doors at shops. the three normal doors are all locked and the only thing wrong with the double doors are that there’s no power connected to them. With this you have two ways to engage the situation, either smash the glass with one of the objects at the reception desk or pull the doors open which isn’t a very difficult task. Once out you find yourself in a well kept garden surrounded by hedges with a fountain in the middle, for the atmosphere of the rest of the establishment being how it is seeing this garden being in almost pristine condition and even the fountain working would hopefully be an earie thing. as you walk around the fountain you would see groupings of flowers in raised beds in front of the hedge walls. The groupings varied from 3 to 4 but they all shared a similarity of that there was one name tag for each grouping whether it be Rebecca or Susan or Ashley one thing was recurring they were the names of the missing people shown earlier in the game, as you continue round you see what looks like the most recent arrivals to this death garden as you can interact with it pushing some of the dirt to the side and revealing a hand still patchily un buried. After this interaction you hear the sound of a metal gate slowly opening and a flashing light round the side of the building.

Once over there you find that the side entrance to the building is open. Entering into the building you find it’s the more commercial side of this business as you find yourself walking through a hallway that leads into a warehouse. Here you find boxes that are stacked ridiculously high and a walkway that you can access to get a better view of the room. Once there you find a large quantity of rope that you can interact with but once carrying will slow you down till you drop it. The other rooms in this area consist of two toilets a main office used by the workers and a break room you can’t access straight away, but when you get close to it you can hear loud wind sounds coming from the door and a horrible draft through the keyhole and from under the door. Searching the office would give you the means to open the staff room (finding the key in a draw). Once in there you’re greeted to a large hole in the floor that you can’t see the bottom of, this would be were you use the rope descending into the next area of the game. (End of idea one)

Categories
3D Character Model

My second attempt and general experimenting

With this task I didn’t really have a set idea of what I wanted as the end goal until about half way though the creating of it, which you’ll definitely see in the screenshots. I was mainly trying to get a grip of the software and experiment with different features that I knew about from using it for a short period of time in college on a mac.

At first I was trying to go for a horror based creature, more so a scary henchman than a large tendril creature. At this point I forgot to increase my dynamesh so I had it set to 12 so it was rather blocky.

After realising the issue I’d given myself I increased the dynamesh poly count and continued on starting to slowly move the head from being less rectangular and more of an oval, similar to a normal humans head.

At this point I realised I wanted to generally create a rough character of a punk rocker of sorts. So I went onto try and fit in some of the stereo types in such as stud earing and a general grungy feeling hence forth the staples around the left ear.

By the end of it once I had added multiple more shapes into it for both the eyes as well as each of the teeth I ended up realising that I have unknowingly created a reject Gorillaz character without even meaning too. Also after inspection of it whilst trying to make the skin smoother and add more detail I ended up adding too many polygons and putting the dynamesh to over 1000 whilst the actual limit I should have been using is about 100 ish.

Categories
3D Character Model

My First Zbrush Attempt/Pumpkin

Although this wasn’t supposed to be my first attempt at zbrush I ended up missing the first lab session due to specific things happing at home that greatly effected me. I followed through the lab session as we went through masks and the general shortcuts of zbrush and its many tools/brushes that it contains. We also were shown dynamesh which allowed up to increase the overall polycount of the model.

Categories
3D Character Model

My Z-Spheres Abominations

This week we learned about Z-Spheres and how to use them in Z-Brush. To start off I initially started by playing around with the tools that were given to me, expanding points and trying to make interesting shapes with it. I ended up creating something that looked quite similar to either a deer of sorts or perhaps a young dragon. I wasn’t really expecting much to come out of this as I wasn’t using a reference images and I didn’t have an end goal in sight, I was mainly creating it to come to grips with this new information.

After that I decided to go straight into the deep end and try and sculpt a human hand, or at least the base shape of a human hand. I feel like personally I did a good job and there isn’t much I can do until I start to sculpt on it. I had multiple reference images for this as well as my actual hand for reference as well.

Categories
3D Assignment

Harvard References

  • Brittney Dillander (2020)AMERICAN DINER RETRO BOOTH CORNER SUITE 50’S 60’S KITCHEN 1.5m X 1.5m CUSTOM SZ [Photograph] https://www.pinterest.co.uk/pin/326370304221746155/ [Accessed 01/11/2020]
  • Mid-Century Modern Freak (2013) Vintage Coke Machine [Photograph] https://midcenturymodernfreak.tumblr.com/post/56339927379/its-the-real-thing-vintage-coke-machine-via [Accessed 01/11/2020]
  • Wotever (2020) 24/7 Diner Neon Sign 64cm x 45cm [Photograph] https://www.wotever.co.uk/neon_signs.php [Accessed 01/11/2020]
  • Trent Furniture (2020) American Diner Furniture [Photograph] https://www.trentfurniture.co.uk/products/all-tables/american-diner-furniture/1 [Accessed 01/11/2020]
  • drinkstuff (2020) Diner Condiment Rack – Tablecraft Retro Wire Table Tidy Condiment Caddy [Photograph] https://www.ebay.co.uk/itm/Diner-Condiment-Rack-Tablecraft-Retro-Wire-Table-Tidy-Condiment-Caddy-/400915347313 [Accessed 01/11/2020]
  • Lime (2020) Retro Wall Clock, 50’s Styled American Diner Wall Clock, Pink [Photograph] https://www.amazon.co.uk/Retro-Clock-Styled-American-Diner/dp/B074WBQ5VW [Accessed 01/11/2020]
  • 3docean (2020) Retro Diner Booth/Bench/Sofa [Photograph] https://www.stlfinder.com/model/retro-diner-booth-bench-sofa-RoKSIDNh/2828238/ [Accessed 01/11/2020]
  • Event Prop Hire (2016) High quality American Diner Bar (3m) available to hire. View American Diner Bar (3m) [Photograph] https://www.pinterest.co.uk/pin/425168021073627001/ [Accessed 01/11/2020]
  • Konig (2020) Konig Retro Radio with Bluetooth Wireless Technology – Beige [Photograph] https://www.amazon.co.uk/Konig-Retro-Bluetooth-Wireless-Technology/dp/B00P7YXAYC [Accessed 01/11/2020]
  • Lauren Clark (2018) classic 50s diner milkshakes [Photograph] https://www.pinterest.co.uk/pin/65302263318708938/ [Accessed 01/11/2020]
  • Hunter (2019) Hunter Original Antique Black 52-in Indoor/Outdoor Ceiling Fan (5-Blade) [Photograph] https://www.lowes.com/pd/Hunter-Original-52-in-Antique-Black-Indoor-Outdoor-Ceiling-Fan-5-Blade/999900941 [Accessed 01/11/2020]

Categories
3D Assignment

Model 10 (Condiments)

This was the final piece that I created and I feel like it’s the best piece that I did. It consist of ketchup, mustard, napkin holder and napkins, salt, pepper and sugar.

Categories
3D Assignment

Model 9 (Radio)

This is my ninth model, and is a vintage radio. I created this by using skills that I developed throughout the rest of my models such as the metal skills being the same as the one on the chair. And the rest of it consisting of a lot of squares being bevelled to give the illusion of it being smoothed.

Categories
3D Assignment

Model 8 (Soda Machine)

This is my eighth model that I created. This is an old fashioned soda machine. This was created using mainly squares whilst also using the Boolean feature to cut out areas at the bottom to make the stand.

Whilst writing this I have seen and realised that I also missed creating the handle for the soda machine itself.

Categories
3D Assignment

Model 7 (Ceiling Fan)

This is my seventh model that I created, and is a ceiling fan. This one was very enjoyable to create, I first started by creating the main middle piece of it. This consisted of just making a lot of cylinders and connecting them together whilst bevelling the edges to smooth everything down.

After that I created one of the fan pieces, I made this by combining a torus cylinder and square together and once made duplicated and moved across the four area of the fan.

Categories
3D Assignment

Model 6 (Clock)

This is my sixth model, which consists of a clock. This is the only model that I used the smooth tool on.

To start off with I created one square making sure that I used the multi cut tool as well as holding ctrl to create edges and boundaries around the outside so once I used the smooth tool it would smooth the edges and not turn the square into a circle. After that I altered the vertex of the corners of the square and dragged them in, to make the corners smooth out more.

After that I went and created the middle bit, Which I created using a cylinder and spreading it out and flattening it down at the same time. After that I added a bevel onto the outer edge to create the loop of metal around the outside of the clock face.